When you’re riding your bike every where, you quickly realize there are a range of security circumstances that require different locking setups. Sometimes you’re just looking for a quick stop and just need to prevent someone from rolling off with the bike; others demand a more serious locking arrangement.
The typical answer to this is a wheel lock (sometimes referred to as a wheelock). The Abound does not have a straightforward locking arrangement for a wheel lock. To that end, we’ve created a recommended setup that lets you install one.
| Item | Typical Cost |
|---|---|
| Lock: ABUS 4750 XL Frame Lock (Amazon Link) | $60 |
| Chain: Kryptonite Ring Lock 912 Plug-In Chain (Amazon Link) | $50 |
| Mounting Bracket: 3d-Printable bracket mount (3D Model) | (self-produced) |
| Mounting hardware (4 stainless steel M5 bolts, 2 stainless steel nylon lock nuts, 2 zip ties) | Hardware store (~$6) |
This Frame Lock is a specific model that is needed to fit around the Abound fender and tire. Because it is uncommon in the US, sourcing this lock may be somewhat difficult.
The Kryptonite 912 Plug-in Chain is the largest thickness plug-in chain is thicker than the thickest chain available from ABUS (6mm). This chain works with the ABUS 4750 XL lock; it may not work in smaller ABUS locks.
If you are based in the Camberville area, this can be purchased as a kit. E-mail cafelock@communitypedalpower.org for more information..
Installation
To install the lock kit and mount:
Attach the ABUS Lock to the 3D printed mount.
- Remove the plastic mounting hole covers from the front of the ABUS lock.
- Align the back of the lock to the flat side of the 3D printed mount, aligning the bolt hole with the center mounting hole on the lock.
- Thread the provided bolt through the non-flat side of the 3d printed mount, then through the middle hole of the ABUS lock; the bolt head should be on the mount side, with the bolt threads on the lock side.
- Insert a zip-tie through the lower hole in the ABUS lock, aligned with the hole in the vertical hole in the 3D printed mount. The ziptie will wrap around the fork, so the ziptie lock should be facing to the outside edge of the mount.
- Attach the lock to the mount using the bolts provided with the lock, and a nylock nut on each side.
Attach the Lock to the Fork
- Remove the two bolts from the fork which attach the fender stays. Retain the washers from the bolt.
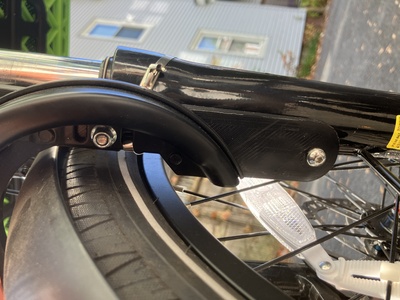
- Slide the wheel lock over the fender, with the front of the lock facing the rear of the bike, and the non-flat part of the mount aligned against the frame. (This requires bending the fender plastic slightly to clear the mount + lock.)
- Loosely mount the mount to the fork using the longer M5 bolts that you purchased to use with the mount. The bolt should be threaded through the stock washer (from the fender stay), then the mount, then the fender stay. (Do not yet tighten the bolt fully.)
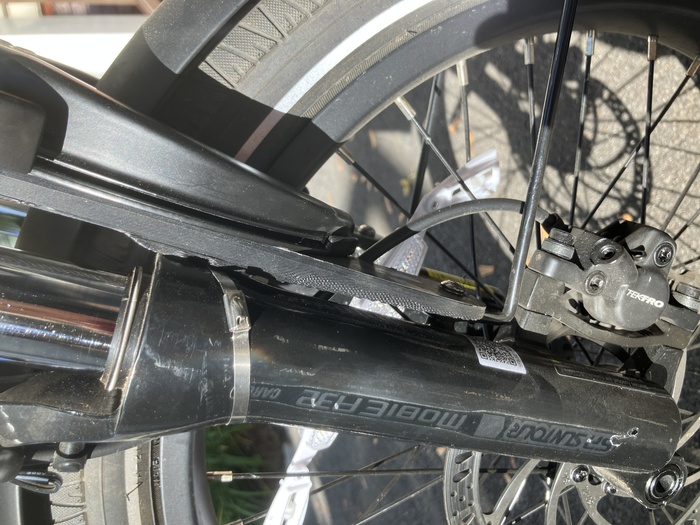
- Before tightening the bolt fully, wrap the zip-tie around the fork. This zip tie mount prevents the plastic mount from wobbling due to the weight of the lock. When mounting on the right hand fork, ensure that you wrap the zip-tie between the brake cable and the fork, so that the zip tie does not compress the brake cable.
- Once you have zip-tied the mount to the fork, fully screw in the bolt into the fender stays.